2025 ETHTaipei Workshop

Overview
This tutorial guides developers through getting started with Mopro and building a native mobile app from scratch. It covers
-
Setting up an example multiplier2 Circom circuit
- Starting from 0. Prerequisites
-
Modifying it to use a different circuit, such as keccak256
- Starting from 6. Prerequisites
-
Additionally, we'll integrate the semaphore-rs Rust crate to generate native bindings and run the implementation on both iOS and Android.
-
We also offer comprehensive iOS and Android tutorials to guide you through the entire process, ensuring you don’t miss anything!
- iOS
- Android
0. Prerequisites
- XCode or Android Studio
- If you're using Android Studio, ensure that you follow the Android configuration steps and set the
ANDROID_HOMEenvironment variable.
- If you're using Android Studio, ensure that you follow the Android configuration steps and set the
- Rust and CMake
Documentation: https://zkmopro.org/docs/prerequisites
1. Download Mopro CLI tool
We offer a convenient command-line tool called mopro to streamline the development process. It functions similarly to tools like npx create-react-app or Foundry, enabling developers to get started quickly and efficiently.
git clone https://github.com/zkmopro/mopro
cd mopro/cli
cargo install --path .
cd ../..
2. Initialize a project with Mopro CLI
The mopro init command helps you create a Rust project designed to generate bindings for both iOS and Android.
This step is similar to running npx create-react-app, so select the directory where you want to create your new app.
mopro init
Start by selecting a name for your project (default: mopro-example-app).
Next, choose the proving system that best fits your needs—Mopro currently supports both circom and halo2. For this example, we’ll be using circom.
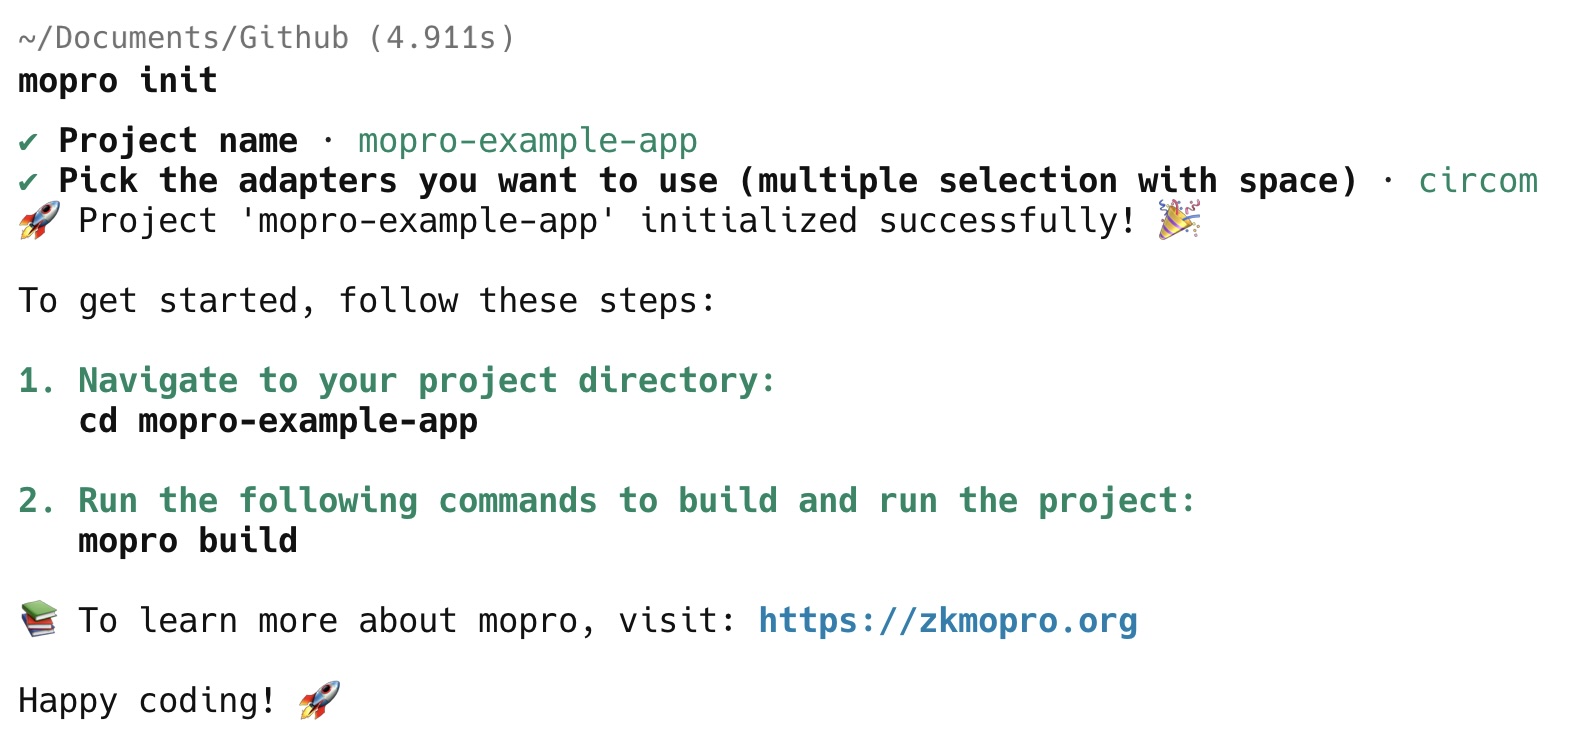
Next, navigate to your project directory by running:
cd mopro-example-app
3. Build Rust bindings with mopro CLI
mopro build command can help developers build binaries for mobile targets (e.g. iOS and Android devices).
mopro build
-
Choose
debugfor faster builds during development orreleasefor optimized performance in production. -
Select the platforms you want to build for:
ios,android,web. -
Select the architecture for each platform:
- iOS:
| Architecture | Description | Suggested |
|---|---|---|
aarch64-apple-ios | For physical iOS devices | ✅ |
aarch64-apple-ios-sim | For M-series Mac simulators | ✅ |
x86_64-apple-ios | For Intel-based Mac simulators | - |
- Android:
| Architecture | Description | Suggested |
|---|---|---|
x86_64-linux-android | For 64-bit Intel architecture (x86_64) | ✅ |
i686-linux-android | For 32-bit Intel architecture (x86) | - |
armv7-linux-androideabi | For 32-bit ARM architecture (ARMv7-A) | - |
aarch64-linux-android | For 64-bit ARM architecture (ARMv8-A) | ✅ |

The build process may take a few minutes to complete.
Next, you will see the following instructions displayed:
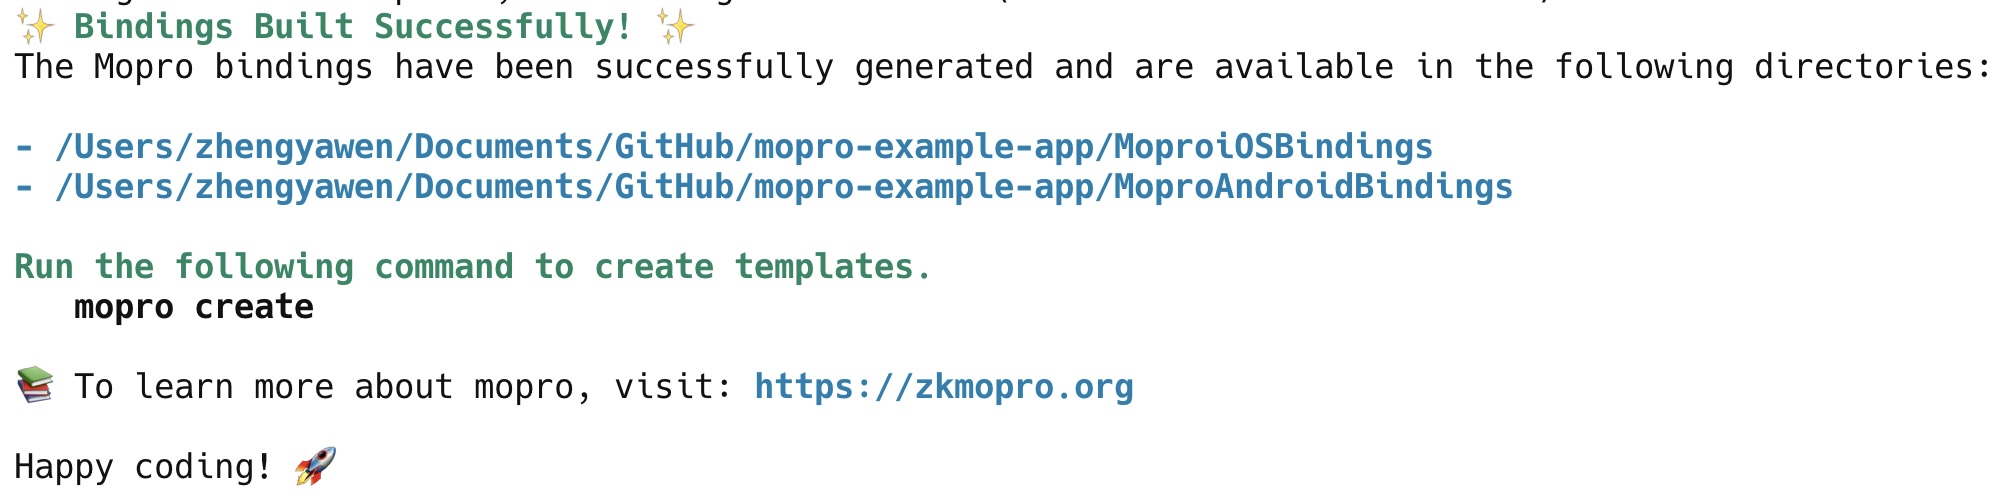
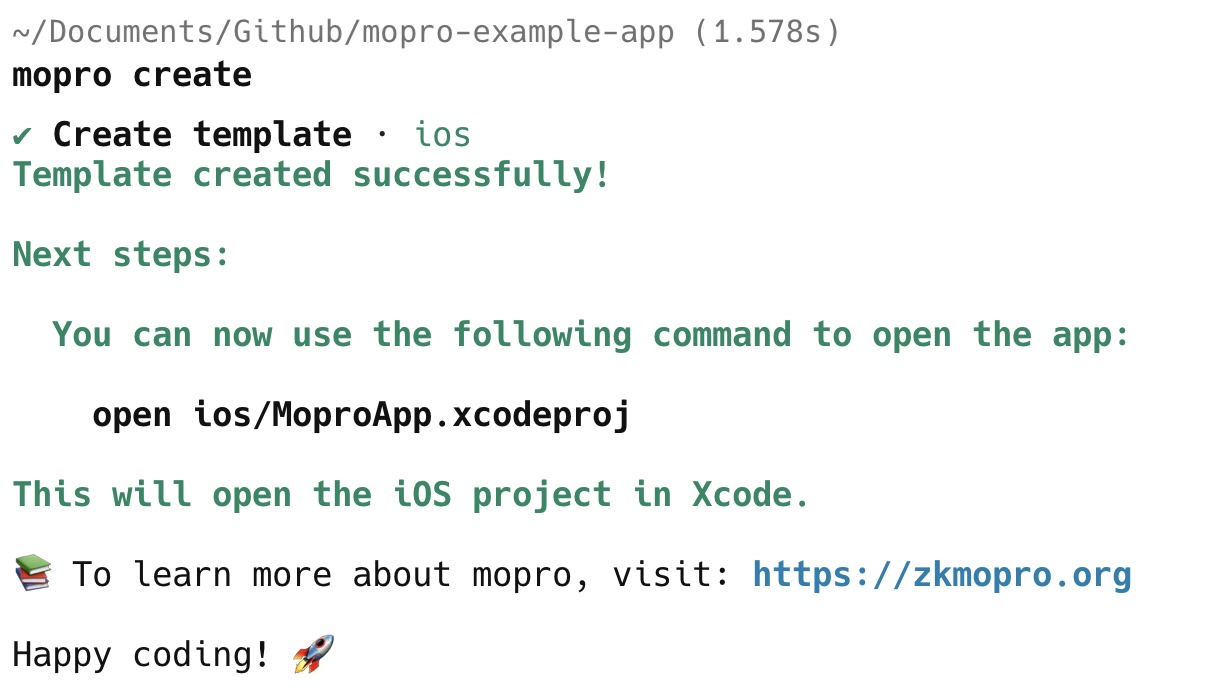
4. Create templates for mobile development
mopro create command generates templates for various platforms and integrates bindings into the specified directories.
mopro create
Currently supported platforms:
- iOS (Xcode project)
- Android (Android Studio project)
- React Native
- Flutter
- Web
After running the mopro create command, a new folder will be created in the current directory, such as:
iosandroidreact-nativeflutterweb(currently does not support Circom prover)
You will then see the following instructions to open the project:
If you want to create multiple templates, simply run mopro create again and select a different framework each time.

5. Run the app on a device/simulator
iOS
Open the Xcode project by running the following command:
open ios/MoproApp.xcodeproj
Select the target device and run the project by pressing cmd + R.
Alternatively, you can watch this video to see how to run the app.
Android
Open the Android Studio project by running the following command:
open android -a Android\ Studio
Run the project by pressing ^ + R or ctrl + R.
Alternatively, you can watch this video to see how to run the app.
6. Update circuits
This section explains how to update circuits with alternative witness generators and corresponding zkey files. We use the Keccak256 circuit as a reference example here.
-
Add wasm and zkey file in the
test-vectors/circomfolder -
In
src/lib.rsfile, update the circuit's witness generator function definition.- rust_witness::witness!(multiplier2);
+ rust_witness::witness!(keccak256256test);
mopro_ffi::set_circom_circuits! {
- ("multiplier2_final.zkey", WitnessFn::RustWitness(multiplier2_witness))
+ ("keccak256_256_test_final.zkey", WitnessFn::RustWitness(keccak256256test_witness))
}warningThe name should match the lowercase version of the WASM file, with all special characters removed.
e.g.
multiplier2->multiplier2
keccak_256_256_main->keccak256256main
aadhaar-verifier->aadhaarverifier -
Similar to Step 3, regenerate the bindings to reflect the updated circuit.
mopro build -
Manually update the bindings in the app by replacing the existing ones.
-
iOS:
- Replace
ios/MoproiOSBindingswithMoproiOSBindings.
- Replace
-
Android:
-
Replace
android/app/src/main/jniLibswithMoproAndroidBindings/jniLibs -
Replace
android/app/src/main/java/uniffiwithMoproAndroidBindings/uniffi
-
infoWe aim to provide the
mopro updateCLI tool to assist with updating bindings. Contributions to this effort are welcome.https://github.com/zkmopro/mopro/issues/269 -
-
Copy zkeys to assets
-
iOS:
Open Xcode, drag in the zkeys you plan to use for proving, then navigate to the project’s Build Phases. Under Copy Bundle Resources, add each zkey to ensure it's included in the app bundle.Alternatively, you can watch this video to see how to copy zkey in XCode.
-
Android
Paste the zkey in the assets folder:android/app/src/main/assets.Alternatively, you can watch this video to see how to copy zkey in XCode.
-
-
Update circuit input and zkey path
-
Update
zkeyPathtokeccak256_256_test_final- iOS:
- private let zkeyPath = Bundle.main.path(forResource: "multiplier2_final", ofType: "zkey")!
+ private let zkeyPath = Bundle.main.path(forResource: "keccak256_256_test_final", ofType: "zkey")!- Android:
- val zkeyPath = getFilePathFromAssets("multiplier2_final.zkey")
+ val zkeyPath = getFilePathFromAssets("keccak256_256_test_final.zkey") - iOS:
-
Update circuit inputs: https://ci-keys.zkmopro.org/keccak256.json
- iOS:
- let input_str: String = "{\"b\":[\"5\"],\"a\":[\"3\"]}"
+ let input_str: String = "{\"in\":[\"0\",\"0\",\"1\",\"0\",\"1\",\"1\",\"1\",\"0\",\"1\",\"0\",\"1\",\"0\",\"0\",\"1\",\"1\",\"0\",\"1\",\"1\",\"0\",\"0\",\"1\",\"1\",\"1\",\"0\",\"0\",\"0\",\"1\",\"0\",\"1\",\"1\",\"1\",\"0\",\"0\",\"0\",\"0\",\"0\",\"0\",\"0\",\"0\",\"0\",\"0\",\"0\",\"0\",\"0\",\"0\",\"0\",\"0\",\"0\",\"0\",\"0\",\"0\",\"0\",\"0\",\"0\",\"0\",\"0\",\"0\",\"0\",\"0\",\"0\",\"0\",\"0\",\"0\",\"0\",\"0\",\"0\",\"0\",\"0\",\"0\",\"0\",\"0\",\"0\",\"0\",\"0\",\"0\",\"0\",\"0\",\"0\",\"0\",\"0\",\"0\",\"0\",\"0\",\"0\",\"0\",\"0\",\"0\",\"0\",\"0\",\"0\",\"0\",\"0\",\"0\",\"0\",\"0\",\"0\",\"0\",\"0\",\"0\",\"0\",\"0\",\"0\",\"0\",\"0\",\"0\",\"0\",\"0\",\"0\",\"0\",\"0\",\"0\",\"0\",\"0\",\"0\",\"0\",\"0\",\"0\",\"0\",\"0\",\"0\",\"0\",\"0\",\"0\",\"0\",\"0\",\"0\",\"0\",\"0\",\"0\",\"0\",\"0\",\"0\",\"0\",\"0\",\"0\",\"0\",\"0\",\"0\",\"0\",\"0\",\"0\",\"0\",\"0\",\"0\",\"0\",\"0\",\"0\",\"0\",\"0\",\"0\",\"0\",\"0\",\"0\",\"0\",\"0\",\"0\",\"0\",\"0\",\"0\",\"0\",\"0\",\"0\",\"0\",\"0\",\"0\",\"0\",\"0\",\"0\",\"0\",\"0\",\"0\",\"0\",\"0\",\"0\",\"0\",\"0\",\"0\",\"0\",\"0\",\"0\",\"0\",\"0\",\"0\",\"0\",\"0\",\"0\",\"0\",\"0\",\"0\",\"0\",\"0\",\"0\",\"0\",\"0\",\"0\",\"0\",\"0\",\"0\",\"0\",\"0\",\"0\",\"0\",\"0\",\"0\",\"0\",\"0\",\"0\",\"0\",\"0\",\"0\",\"0\",\"0\",\"0\",\"0\",\"0\",\"0\",\"0\",\"0\",\"0\",\"0\",\"0\",\"0\",\"0\",\"0\",\"0\",\"0\",\"0\",\"0\",\"0\",\"0\",\"0\",\"0\",\"0\",\"0\",\"0\",\"0\",\"0\",\"0\",\"0\",\"0\",\"0\",\"0\",\"0\",\"0\",\"0\",\"0\",\"0\",\"0\",\"0\",\"0\",\"0\",\"0\",\"0\",\"0\",\"0\",\"0\"]}"- Android:
- val input_str: String = "{\"b\":[\"5\"],\"a\":[\"3\"]}"
+ val input_str: String = "{\"in\":[\"0\",\"0\",\"1\",\"0\",\"1\",\"1\",\"1\",\"0\",\"1\",\"0\",\"1\",\"0\",\"0\",\"1\",\"1\",\"0\",\"1\",\"1\",\"0\",\"0\",\"1\",\"1\",\"1\",\"0\",\"0\",\"0\",\"1\",\"0\",\"1\",\"1\",\"1\",\"0\",\"0\",\"0\",\"0\",\"0\",\"0\",\"0\",\"0\",\"0\",\"0\",\"0\",\"0\",\"0\",\"0\",\"0\",\"0\",\"0\",\"0\",\"0\",\"0\",\"0\",\"0\",\"0\",\"0\",\"0\",\"0\",\"0\",\"0\",\"0\",\"0\",\"0\",\"0\",\"0\",\"0\",\"0\",\"0\",\"0\",\"0\",\"0\",\"0\",\"0\",\"0\",\"0\",\"0\",\"0\",\"0\",\"0\",\"0\",\"0\",\"0\",\"0\",\"0\",\"0\",\"0\",\"0\",\"0\",\"0\",\"0\",\"0\",\"0\",\"0\",\"0\",\"0\",\"0\",\"0\",\"0\",\"0\",\"0\",\"0\",\"0\",\"0\",\"0\",\"0\",\"0\",\"0\",\"0\",\"0\",\"0\",\"0\",\"0\",\"0\",\"0\",\"0\",\"0\",\"0\",\"0\",\"0\",\"0\",\"0\",\"0\",\"0\",\"0\",\"0\",\"0\",\"0\",\"0\",\"0\",\"0\",\"0\",\"0\",\"0\",\"0\",\"0\",\"0\",\"0\",\"0\",\"0\",\"0\",\"0\",\"0\",\"0\",\"0\",\"0\",\"0\",\"0\",\"0\",\"0\",\"0\",\"0\",\"0\",\"0\",\"0\",\"0\",\"0\",\"0\",\"0\",\"0\",\"0\",\"0\",\"0\",\"0\",\"0\",\"0\",\"0\",\"0\",\"0\",\"0\",\"0\",\"0\",\"0\",\"0\",\"0\",\"0\",\"0\",\"0\",\"0\",\"0\",\"0\",\"0\",\"0\",\"0\",\"0\",\"0\",\"0\",\"0\",\"0\",\"0\",\"0\",\"0\",\"0\",\"0\",\"0\",\"0\",\"0\",\"0\",\"0\",\"0\",\"0\",\"0\",\"0\",\"0\",\"0\",\"0\",\"0\",\"0\",\"0\",\"0\",\"0\",\"0\",\"0\",\"0\",\"0\",\"0\",\"0\",\"0\",\"0\",\"0\",\"0\",\"0\",\"0\",\"0\",\"0\",\"0\",\"0\",\"0\",\"0\",\"0\",\"0\",\"0\",\"0\",\"0\",\"0\",\"0\",\"0\",\"0\",\"0\",\"0\",\"0\",\"0\",\"0\",\"0\",\"0\",\"0\",\"0\",\"0\",\"0\",\"0\",\"0\",\"0\",\"0\",\"0\",\"0\",\"0\",\"0\",\"0\"]}" - iOS:
- Then Run the app again like in step 5.
7. Update Rust exported functions
Currently, only generateCircomProof and verifyCircomProof are available with the bindings, but the bindings can be extended to support nearly all Rust functions.
Here is an example demonstrating how to use the Semaphore crate.
-
Update
Cargo.tomlImport semaphore crate from: https://github.com/worldcoin/semaphore-rs
infoWe are using this specific commit 340d4ad for
semaphore-rs.Cargo.tomlsemaphore-rs = { git = "https://github.com/worldcoin/semaphore-rs", features = ["depth_16"], rev = "340d4ad"} -
Define a function to generate semaphore proof
Here is an example to define semaphore
proveandverifyinsrc/lib.rsAlternatively, we can create a demo function called
semaphore()to run the code from the README.src/lib.rsuse semaphore_rs::{get_supported_depths, hash_to_field, Field, identity::Identity,
poseidon_tree::LazyPoseidonTree, protocol::*};
pub fn semaphore() {
// generate identity
let mut secret = *b"secret";
let id = Identity::from_secret(&mut secret, None);
// Get the first available tree depth. This is controlled by the crate features.
let depth = get_supported_depths()[0];
// generate merkle tree
let leaf = Field::from(0);
let mut tree = LazyPoseidonTree::new(depth, leaf).derived();
tree = tree.update(0, &id.commitment());
let merkle_proof = tree.proof(0);
let root = tree.root();
// change signal and external_nullifier here
let signal_hash = hash_to_field(b"xxx");
let external_nullifier_hash = hash_to_field(b"appId");
let nullifier_hash = generate_nullifier_hash(&id, external_nullifier_hash);
let proof = generate_proof(&id, &merkle_proof, external_nullifier_hash, signal_hash).unwrap();
let success = verify_proof(root, nullifier_hash, signal_hash, external_nullifier_hash, &proof, depth).unwrap();
assert!(success);
}warningYou can also try returning a value; otherwise, nothing will happen after execution. e.g.
pub fn semaphore() -> bool {
    // ...
    return success;
} -
Export the function through UniFFI procedural macros
You can simply use the UniFFI proc-macros (e.g.
#[uniffi::export]) to define the function interfaces.infoFor more details, refer to the UniFFI documentation.
+ #[uniffi::export]
pub fn semaphore() {
    // generate identity
    let mut secret = *b"secret";
... -
Run
mopro buildagain and manually update the bindings for iOS and Android as explained in Step 6. -
You can now call the
semaphore()function you just defined on both iOS and Android. 🎉
8. Conclusion
-
By following the tutorial, you will learn to create a native mobile ZK app with:
- A simple circuit
- Custom circuits
- Custom functions and structs
-
Just like with the Semaphore case, this approach can be extended to any Rust crate, as long as you define the input and output types according to the UniFFI documentation.
-
Alternative platforms, such as wasm for web, and frameworks like React Native and Flutter are also supported. Please check out:
Or simply run
mopro buildfor these frameworks. -
There are still many challenges to address, and contributions are highly encouraged. Feel free to explore the issues list.
-
We encourage developers to build mobile apps, as it helps us enhance the developer experience and gain a deeper understanding of the challenges involved.