From Zero to ZK: Vibe a ZK Mobile App with mopro-ai

TL;DR��
- The problem: Building a mobile app with zero-knowledge (ZK) proofs requires complex environment setup and multiple toolchains. Most developers never get past the setup stage.
- The tool: mopro-ai is a playbook that lets AI coding agents build ZK mobile apps for you.
- Demo result: Starting from a single prompt, an AI agent built vibe-app, a Flutter app that generates and verifies ZK proofs entirely on-device.
The Problem: ZK on Mobile Is Still Too Hard
At workshops, the pattern is always the same. Attendees show up excited to build a mobile proof-of-concept. Within the first hour, half the room is stuck on environment setup. Rust is not installed, or the wrong version. CMake is missing. Android NDK paths are misconfigured. Xcode command-line tools point to the wrong directory. The circuit compiles, but the trusted setup artifacts end up in the wrong folder. By the time someone gets to actually calling a prove function from Dart or Swift, the session is over.
The gap between "I want to try ZK on mobile" and "I have a working proof" is surprisingly wide. Here is what stands between a developer and a running mobile ZK app:
- Environment setup: Rust toolchain (rustup, cargo, cross-compilation targets), platform SDKs (Xcode with command-line tools, Android Studio with NDK and JDK 17+, Flutter SDK), and all the PATH variables that glue them together
- Circuit knowledge: Circom compiler, snarkjs for trusted setup, circomlib dependencies via npm, and the naming conventions and file structure that make a circuit compile cleanly
- Mobile knowledge: Native build systems (Gradle, Xcode project settings), FFI wiring (UniFFI bindings, flutter_rust_bridge code generation), and asset bundling for
.zkeyfiles - Mopro knowledge: The correct sequence of
mopro init,mopro build,mopro create, which flags to pass for each platform, and how these commands interact with the layers above
Each layer has its own failure modes and error messages. A developer who is proficient in Flutter but unfamiliar with Rust will hit different walls than one who knows Circom but has never opened Android Studio. The toolchain complexity is the bottleneck, not the ZK concepts themselves.
A ZK Mobile App Playbook for Agents
mopro-ai is not just a plugin. It is a manual with structured knowledge that lets AI agents use mopro accurately and fluently instead of guessing at CLI flags and build sequences.
To install in Claude Code:
/plugin marketplace add zkmopro/mopro-ai
/plugin install mopro
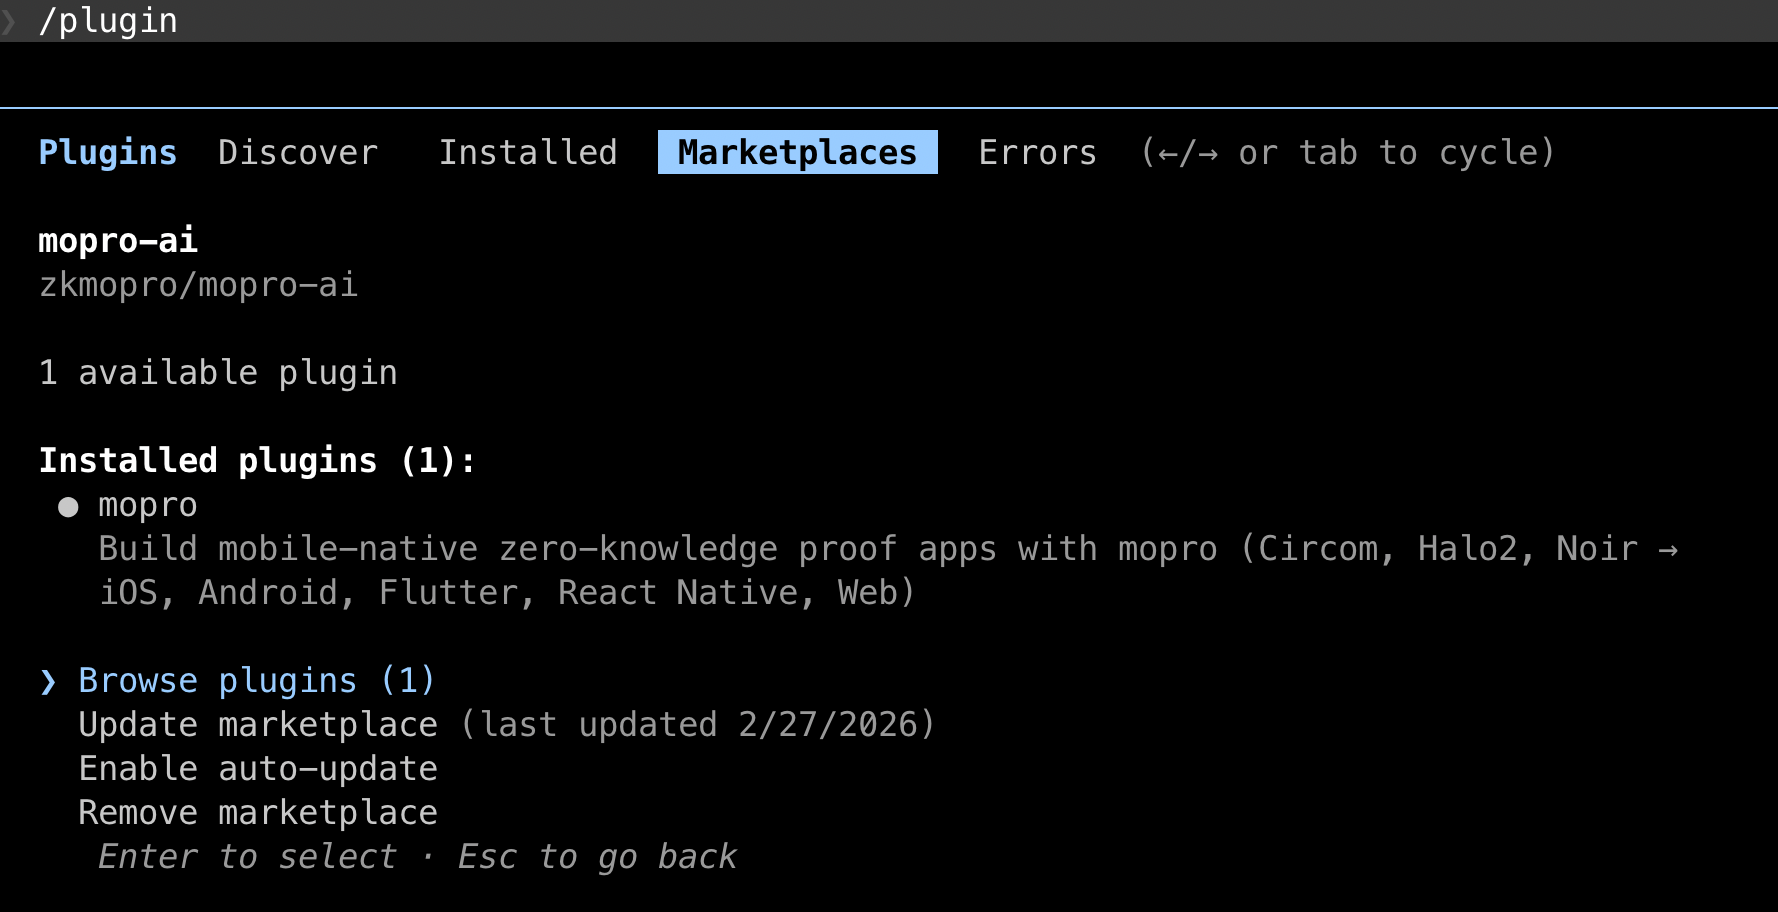 |
|---|
| Plugin Installation for mopro-ai |
The playbook covers the full mopro lifecycle:
| Command | What it does |
|---|---|
/mopro:check-env | Diagnose environment and missing tools |
/mopro:init | Initialize a new mopro project |
/mopro:build | Build ZK bindings (5-15 min, runs in background) |
/mopro:create | Generate app template from bindings |
/mopro:test | Run Rust, FFI, or UI tests |
/mopro:device | Manage simulators, emulators, devices |
/mopro:new | Full workflow: init + build + create |
Beyond slash commands, skills also activate automatically based on context. Mention "build for iOS" and the build skill triggers. Say "check my environment" and the env diagnostic runs. The agent does not need to memorize command names. It just needs mopro-ai loaded.
Crucially, mopro-ai includes guardrails that prevent common agent mistakes: never chain build + create in one step (builds take minutes and must be confirmed before proceeding), always pass --platforms flutter for Flutter apps (not --platforms ios, which produces incompatible native-only bindings), always use non-interactive CLI flags to avoid blocking on prompts, and never re-run a build without user confirmation. It also encodes error recovery paths and environment diagnostics.
mopro-ai is built on open standards, specifically Agent Skills for auto-triggered workflows and AGENTS.md for universal agent instructions, so it works across Claude Code, Cursor, VS Code Copilot, Codex CLI, and Gemini CLI.
What We Are Building
The concrete example for this tutorial is vibe-app: a Flutter app that implements challenge-response authentication using zero-knowledge proofs. The user proves they know a secret S such that Poseidon(S, nonce) = expectedHash, without revealing S.
Everything runs on-device. No server-side proving. The "server" in the demo is a mock that provides the challenge (nonce + expected hash), simulating what a real backend would do.
The Prompt That Built vibe-app
Here is the prompt that kicked off the entire project:
"Build a Flutter mobile app that uses mopro for proving knowing a server challenge in Circom. It should use mopro skills."
That is it. One sentence. With mopro-ai loaded, the agent recognized this as a mopro project and produced a 6-step implementation plan:
- Initialize a mopro project with Circom adapter
- Write the Circom circuit and run trusted setup
- Customize the Rust core to register the circuit
- Build bindings and create a Flutter app template
- Customize the Flutter UI for challenge-response flow
- Test end-to-end on a simulator
Each step maps directly to a mopro skill. The agent knew the correct CLI flags, the right file locations, and the build sequence, because mopro-ai told it exactly how mopro works. Without the playbook, the agent would have had to search documentation, guess at flags, and likely hit several dead ends before arriving at a working build. With the playbook, it executed the plan on the first try.
What the Agent Did
Step 1: Initialize the project
mopro init --project_name vibe-app --adapter circom
This scaffolds a Rust project with:
Cargo.tomlwithmopro-ffi,circom-prover, andrust-witnessdependenciessrc/lib.rswith template slots for each proof systemtest-vectors/directory for circuit artifactsConfig.tomlfor build configuration
Step 2: Write the circuit and run trusted setup
The agent wrote a Circom circuit implementing Poseidon-based challenge-response:
pragma circom 2.0.0;

include "node_modules/circomlib/circuits/poseidon.circom";

template ChallengeResponse() {
    signal input secret;       // private
    signal input nonce;        // public
    signal input expectedHash; // public

    component hasher = Poseidon(2);
    hasher.inputs[0] <== secret;
    hasher.inputs[1] <== nonce;

    expectedHash === hasher.out;
}

component main {public [nonce, expectedHash]} = ChallengeResponse();
The circuit takes three inputs: a private secret and two public signals (nonce and expectedHash). It computes Poseidon(secret, nonce) and constrains the result to equal expectedHash. A valid proof demonstrates knowledge of the secret without revealing it.
After writing the circuit, the agent compiled it with Circom and ran trusted setup using snarkjs to produce the .zkey and .wasm artifacts, then placed them in test-vectors/circom/.
Step 3: Customize the Rust core
The agent modified src/lib.rs to register the circuit using mopro's macro system:
mod witness {
    rust_witness::witness!(challengeresponse);
}

crate::set_circom_circuits! {
    ("challengeresponse_final.zkey",
     circom_prover::witness::WitnessFn::RustWitness(
         witness::challengeresponse_witness
     )),
}
The rust_witness! macro generates a native Rust witness calculator from the compiled circuit, eliminating the need for WASM-based witness generation at runtime. The set_circom_circuits! macro registers the circuit with its .zkey file so generateCircomProof() knows which proving key to use.
The agent also wrote Rust tests to validate the circuit with known inputs:
#[test]
fn test_challenge_response_valid() {
    let circuit_inputs = serde_json::json!({
        "secret": "12345",
        "nonce": "67890",
        "expectedHash": "11344094074881186137859743404234365978119253787583526441303892667757095072923"
    }).to_string();

    let result = generate_circom_proof(
        ZKEY_PATH.to_string(), circuit_inputs, ProofLib::Arkworks
    );
    assert!(result.is_ok());

    let proof = result.unwrap();
    let verify = verify_circom_proof(
        ZKEY_PATH.to_string(), proof, ProofLib::Arkworks
    );
    assert!(verify.is_ok());
}
Step 4: Build bindings and create Flutter app
The agent configured Config.toml:
build_mode = "release"
target_adapters = ["circom"]
target_platforms = ["flutter"]
auto_update = false
Then ran the two-step build process:
mopro build --platforms flutter --mode release
This cross-compiles the Rust prover for the target architectures and generates mopro_flutter_bindings/, a Flutter package containing the native libraries and Dart API.
After confirming the build succeeded:
mopro create --framework flutter
This generates a Flutter app template in flutter/ with the bindings already wired up, the .zkey file bundled as an asset, and a working pubspec.yaml.
Step 5: Customize the Flutter UI
The agent built a step-by-step authentication flow in Dart. The key integration points are the proof generation and verification calls:
Generating a proof:
final proofResult = await generateCircomProof(
  zkeyPath: zkeyPath,
  circuitInputs: '{"secret":"$secret","nonce":"$nonce","expectedHash":"$expectedHash"}',
  proofLib: ProofLib.arkworks,
);
Verifying a proof:
final valid = await verifyCircomProof(
  zkeyPath: zkeyPath,
  proofResult: proofResult,
  proofLib: ProofLib.arkworks,
);
These two function calls are the entire ZK integration surface. Everything else (loading the proving key, computing the witness, running the Groth16 prover, serializing the proof) is handled by the mopro bindings underneath.
The UI guides users through four steps: enter a secret, receive a challenge from the (mock) server, generate a ZK proof, and verify it. Each step displays timing information and proof metadata so the user can see exactly what is happening.
The mock server simulates what a real backend would do: given a registered user's secret, it returns a nonce and the pre-computed Poseidon(secret, nonce) hash. In production, the server would never see the secret. It would only store the hash and generate fresh nonces for each authentication attempt. The ZK proof lets the user demonstrate they know the secret that produces the expected hash, without transmitting the secret itself.
Step 6: Test on simulator
The agent started an iOS simulator and ran the app:
cd flutter && flutter run
The flow: enter 12345 as the secret, tap "Request Challenge" to get a nonce and expected hash from the mock server, tap "Generate ZK Proof" to run the Groth16 prover on-device, then tap "Verify Proof" to confirm the proof is valid. Proof generation typically completes in a few seconds on a modern phone or simulator. The secret never leaves the device.
The agent also handled the .zkey asset bundling by copying the proving key into flutter/assets/ and registering it in pubspec.yaml so Flutter can load it at runtime. This is one of those details that is easy to miss manually but that mopro-ai's app skill covers automatically.
What mopro-ai Handled For You
Here is what the developer provided versus what mopro-ai automated:
| Developer provided | mopro-ai handled |
|---|---|
| One-sentence prompt describing the app | CLI flag selection and build sequencing |
| Choice of proof system (Circom) | Rust project scaffolding and dependency wiring |
| Choice of platform (Flutter) | Cross-compilation for target architectures |
| Circuit logic (Poseidon challenge-response) | FFI binding generation (flutter_rust_bridge) |
| UI requirements (step-by-step auth flow) | Asset bundling (.zkey in Flutter assets) |
Macro registration (rust_witness!, set_circom_circuits!) | |
| Build duration management (background execution) | |
| Platform-specific configuration (pubspec.yaml, Gradle) |
Without mopro-ai, the agent would have had to guess at mopro's CLI interface, likely passing wrong flags (--platforms ios instead of --platforms flutter), missing the non-interactive flag requirements, or trying to chain build and create in a single step. mopro-ai eliminates that guesswork.
Vibe Your First ZK Mobile App
Building a mobile ZK app no longer requires mastering five different toolchains. With mopro-ai loaded, an AI coding agent can go from a one-sentence description to a working Flutter app with on-device Groth16 proving. It handles the Rust scaffolding, circuit compilation, FFI binding generation, and platform wiring along the way.
The developer's job shifts from fighting build systems to designing circuits and user experiences. That is the gap mopro-ai is designed to close.
Try it yourself: install mopro-ai, describe the ZK app you want to build, and let the agent handle the plumbing.
References
- mopro-ai: AI playbook for building mobile ZK apps with mopro
- mopro: The mopro toolkit repository
- mopro documentation: Official mopro docs
- vibe-app: The Flutter ZK auth demo built in this tutorial
- Agent Skills specification: Open standard for AI agent skill packages